Tag Archive for: tires

Saddle bag and essential items explained

It’s important to carry a saddle bag with you on all of your bike rides. You know this is true if you’ve ever had a flat tire or minor mechanical problem. A saddle bag is specifically designed to hang underneath your bicycle seat. They come in a variety of sizes and styles. Make sure yours fits comfortably on the back of your bike. Some people even have two different saddles bags, one for training rides and one for races. Check the links below to see some recommended items. Pro tip: follow the dos and don’ts of bike buying and make sure your saddle bag has what it needs.

At a minimum, it should have an inner tube, a patch kit, tire levers, and a bicycle-specific multi-tool in it. If you don’t know the size of your inner tube, check the sidewall of your tire. You could also ask your local bike shop what’s best for your bike. Pro tip: take care of your bike before issues arise with this helpful replacement timeline.

Fix a flat tire

Some cyclists carry a hand pump on their bike. If you don’t, it’s essential to have a CO2 cartridge and inflator. A flat tire can be fixed in less than five minutes. You can get back to riding if you have the tools and spare with you to fix it. Otherwise, you’ll be calling a friend for a ride or maybe calling in late to work if you’re mid-commute when the flat tire happens.

Other mechanical problems

A loose bolt could allow your handlebar to move or your seat to slip. Those two issues are an easy fix if your saddle bag has a bicycle-specific multi-tool. A broken chain is a less common occurrence. A chain tool is included in many multi-tools. It’s a necessity if your chain breaks while you’re out on a ride. You might want to consider carrying a “missing link” for any chain issues.

Learn how to change an inner tube or use a CO2 inflator. Talk to your mechanic or ask a friend to teach you how before your next long bike ride. Finally, you should always have a cell phone, some cash, and identification with you in case of an emergency. You don’t need to store those items in your saddle bag. The cash is useful on long bikes rides when you plan to stop at a gas station to refuel.

Learn about TPI and make sure your bike has the tires you need

Curious about TPI? So are a lot of other cyclists and triathletes. In short, TPI stands for Threads per Inch. Take the time to learn about TPI, how it can impact your ride, and what bike tires we recommend. This knowledge can be beneficial during your Kerrville Triathlon training!

Tires are made with threads. Lower-end tires have lower counts which tend to make them heavier and provide a harsher ride. Higher-end tires have higher thread counts which allow them to ride smoother and contour to bumps on the road better. On some tires, the threads are mixed in with Kevlar or some other type of durable fabric. This makes them more resilient to flats. It is important to note that a higher TPI tire is not more prone to flats than a lower TPI tire. No matter what the threads per inch is on your tires, there are steps you can take to prevent flat tires.

Threads per inch and the tires you need

Tires with lower threads per inch are less expensive and are more common for training use. Higher TPI tires are more expensive and tend to be used for racing or for riding roads where you are looking for a smoother ride.

For a great low TPI tire, we recommend the Vittoria Zaffiro Tire. For those of you looking for the high TPI tire consider the Vittoria Diamante, the Vittoria Open Corsa, the Vredestein Tricomp, or the Continental Grand Prix 4000.

Check with James Balentine at City Limit Cycles to see if these tires are still good options.

We highlight the pros and cons of tubulars and clinchers

If you’re relatively new to triathlon then you’ve probably noticed many new terms, like tubulars and clinchers. Even veteran triathletes are learning new terminology about the sport. Whether you’re new to triathlon or you’ve been racing for years, we break down the difference between tubulars and clinchers.

Learn about the pros and cons before you decide to make any purchases, replacements, or upgrades. Click To Tweet

Tubulars

Tubular tires, also known as “sew-ups” or “sprints” differ from clinchers in that they don’t have beads. Instead, the two edges of the tire are sewn together around the inner tube. Tubulars are used on special rims and are held on to the rims by glue.

Pro
– the lightest practical tubulars will always be lighter than the lightest clincher
– if you flat, you can ride on it for a little longer
– if glued properly, the tire will stay on the rim even if it flats
– ride quality
Con
– costs more (rims and tires)
– more difficult to maintain
– hard to repatch as an individual without team support on the road
– you could get tire/rim separation, especially when rims are hot from braking and end up like Joseba Beloki in the 2003 Tour de France.

Clinchers

Conventional tires used on 99% of all bicycles are “clincher” type, also known as “wire-on.” They consist of an outer tire with a u-shaped cross-section and a

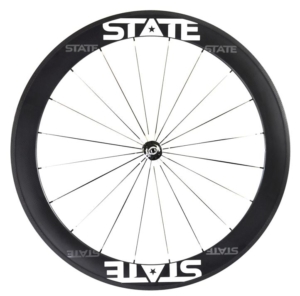
state wheels clincher wheel

State Wheels Carbon Clinchers come in a variety of depths and are handmade in Austin, Texas

separate inner tube. The edges of the tire hook over the edges of the rim and air pressure holds everything in place.

Pro
– wheelsets are less expensive even if you get a really nice set
– replacement tubes are way less expensive
– you can replace the tube without replacing the tire
– wheels are more common
– easier to patch on the road, no need for gluing, stretching tire, etc.
Con
– if you flat, you can’t really ride on it
– some say a lower-quality ride
– will always be heavier than tubulars (tube, tire, clincher interface)
The ride quality and weight differences between tubulars and clinchers are getting smaller, but will always continue to be there. Especially with carbon wheels – carbon clinchers are more difficult to make and will be heavier than their carbon tubular rim counterparts.

Wash your bike and extend the life of its parts

This time of year it seems like you always need to wash your bike. Whether it is from rain or indoor trainer rides, it seems like your bike is always dirty, even a couple of days after you wash your bike.

Everybody knows that when you ride in the rain your bike will get dirty, but it can get just as dirty from sweat and sports drinks when riding on a trainer. Click To Tweet

Items needed to thoroughly degrease and wash your bike

1. Workstand or something to hold the bike off the ground (a rear car rack works well)
2. Brushes (I personally prefer the Finish Line Pro Brush Kit, but there are several different brush sets to choose from)
3. Bucket (Home Depot or Lowes both have cheap 5-gallon buckets)
4. Simple Green (standard green stuff is what we use at the shop)
5. Degreaser (every lube company makes one) Tip: don’t use anything real strong, it can damage the paint finish on your bike
6. Access to a garden hose (don’t use a pressure washer, the high pressure can push the grease out of the bearings)

Follow these steps

The first thing to do is put a little degreaser on the chain. Don’t use too much, a little goes a long way. Let it sit on the chain for a minute or two. Give the chain a light scrubbing and rinse it off with the hose. Next, make a Simple Green solution with about a 3 to 1 ratio of water to Simple Green. Take your big brush and use the solution to wash all the big parts of the bike (frame, fork, wheels, cranks, and derailleurs) Smaller brushes work better in the tight areas. I like to start at the front of the bike and go back so I don’t miss anything.

Use the garden hose to rinse off the entire bike. Don’t forget to wash the bar tape, saddle, and tires. These parts tend to get forgotten and they can get pretty gross if they stay dirty. Washing your tires also gives you a chance to inspect them for big cuts and pieces of glass that may be embedded in the rubber. You can let it dry outside or hand-dry it with a towel. After it has dried off you can then lube the chain and it will be ready to ride next time.

If you keep your bike clean it will prolong the life of every part on the bike and help to keep it working perfectly. Remember: a clean bike is a happy bike.

by: James Balentine, owner of City Limit Cycles, an Austin, Texas-based mobile bicycle repair company that comes to you. Balentine began working with bikes in 1990 when he was 12. He began racing mountain bikes in 1991 and BMX in 1992, winning 12 national championships before turning pro in 1999. He has worked with USA Triathlon as a mechanic for Team USA since 2004. Since 2013, Balentine has worked with the US Paratriathlon team and is their sole mechanic.

Take care of your bike and it’ll take care of you

Triathlon season is rapidly approaching for most triathletes! If you’ve been riding all winter or are brushing the cobwebs off, take the time to learn about/be reminded of a replacement timeline for the parts on your beloved road/tri bike. Whether Kerrville Tri is the only race on your calendar or you’ll close out your tri season on the most scenic triathlon course in Texas, the below replacement recommendations will help ensure your trusted ride is ready to roll when you exit T1. Keep in mind, every triathlete’s replacement timeline is different. If you ride more frequently replace your parts sooner.

Bike care replacement timeline

Bike care is as vital as training.

Tune up: once a year or as needed
Cables replaced: replace every six months or as needed
Tires: 2500 miles
Tubes: until they flat
Chain: 10-speed: every 2000 miles; 9-speed or less: every 2500 miles
Cassette: replace every 15,000 miles (if the chain is replaced regularly)
Bottom bracket: replace when loose or rough
Brake pads: replace when worn halfway through
Bearings: replace when rough
Carbon bars and seat post: replace every 1.5-2 years.
Find yourself in need of some maintenance? Contact City Limit Cycles in Austin or Jack and Adam’s Fredericksburg.

Best of luck this triathlon season.