Learn about aqua jogging and how it can keep you going

Running is a critical component of all training plans and its one-third of triathlon. It’s also the leading recreational and competitive sport that results in some form of injury. This includes sprains, plantar fasciitis, patellofemoral pain syndrome, stress fracture, etc. and they happen to everyone. There’s good news for triathletes experiencing a running-related injury in that they can keep training with aqua jogging. This is an effective form of training that will help you continue training and improve your cardio fitness. Aqua jogging provides a beneficial alternative to running without worsening an existing injury or increasing the stress on your joints. It’s also a great addition to your first 70.3 training plan or the perfect alternative to a 60-minute run.

Aqua jogging explained
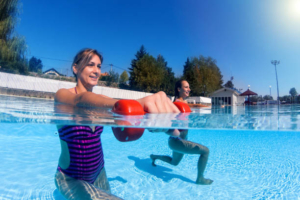
Also called deep water running, this is a cardio exercise that is similar to jogging underwater. It’s performed two ways:

–      running laps in the shallow end of a pool

–      wearing a flotation belt around your midsection and jogging in deeper water

The flotation belt keeps you suspended in deeper water so your legs and arms move freely and mimic running. Your head remains above the water during aqua jogging so you can focus on your breathing as if you were running. Both of these can also be done using light, water-proof weights.

Benefits of aqua jogging

1) Injury rehab
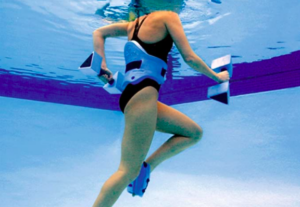
This is a top training choice for injured runners. When wearing a flotation device, aqua jogging takes all the pressure off your lower body. It enables you to work out without experiencing any discomfort or pain from your injury. If you’re running in a shallow pool, the impact on your lower body will be significantly reduced.

2) Triathlon training

An important feature of aqua jogging is that it replicates running on land. Triathletes include this even if they aren’t injured, especially before or after a swim. You’re already in the water and you can continue to improve your cardio output and increase your muscle strength. Think of it as a brick workout! It also helps you maintain your running form and posture, while reducing the wear and tear on your lower body. Just like swimming, aqua jogging is a full-body workout that strengthens everything and helps you improve your balance.

3) General workouts

When you’re running in water the exertion is much less than on land. You don’t have to be injured or training for a triathlon to enjoy the benefits of aqua jogging. Incorporate it into your week and switch it out for a run. If you have a 60-minute run planned, try aqua jogging for 60 minutes. Your weekly mileage will be lower, but you’re still getting a significant workout without all the stress and pounding from running on the pavement.

Aqua jogging is the ideal alternative for injured athletes. But that’s not its only use! Add it to your training plan and turn your swim into a swim/aqua jog brick workout. And if you’re not training for anything specific, this particular exercise is a nice alternative to one of your weekly runs. Just because you’re not pounding the pavement doesn’t mean you can skip foam rolling. Take care of your body, even after spending time in the water, with these 4 effective foam rolling tips.

4 exercises for triathletes that highlight the importance of balance training

If you are an athlete, then you know about the importance of balance training. Balance allows you to stay upright, generate power, and maintain your momentum. Balance is especially important for triathletes. See how important balance will be on race day when you build brick workouts into your training plan.

Even seasoned triathlete’s legs are wobbly when they begin the run.

Once you’ve finished the swim, you go from a horizontal to an upright position as you exit the water. When you’ve completed the bike ride, you go from a seated position pedaling to an upright position. Both of these transitions can make the most seasoned triathletes a little wobbly. Triathletes are mindful of the importance of balance training. It can provide the stability needed when transitioning. Add the 4 exercises below to your training to improve your balance.

Pro tip: once your comfortable with these exercises on the ground, add this Bosu Balance Trainer and take your balance training to the next level!

  1. Single-leg squat

Focus on maintaining a slow speed when squatting and coming up.

  • stand on your right leg with your left knee slightly bent (for balance)
  • bring your arms forward for balance, keep your back straight.
  • keep your left leg still, squat down focusing on the right leg
  • repeat 10 times for each leg
  1. Tree pose

Find something to focus on during a tree pose and stick with it.

The tree pose is a yoga posture that can be done on the floor or on a mat. Apart from improving balance, it strengthens your ankles.

  • stand upright with your spine straight
  • lift your left foot slowly to the side of the calf and place it on your right leg above or below the knee
  • raise your arms above your head, hold the pose for 30 seconds
  • switch legs
  1. Single-leg deadlift

Use dumbbells to further strengthen your hamstrings and glutes.

  • stand on your right leg with your left knee slightly bent (for balance)
  • bend down at the waist, keep your spine straight
  • as you come up, squeeze your hamstrings, abs, and glutes
  • repeat 10 times for each leg
  1. Planks

Focus on engaging your core when holding a plank.

Great way to strengthen your entire core. Increase the time as needed.

  • place your forearms on the ground parallel to each other
  • move your feet out to plank pose and squeeze the glutes
  • hold for 30 seconds (or longer)
  • repeat for 3 sets

The exercises explained above are simple, don’t need weights, and can be done at home. Don’t ignore the importance of balance training! Do these exercises daily and you will find your balance improving daily. Pair the exercises with this advice and learn how to hydrate better when cycling. If you’re crunched for time, these additional exercises can be completed during your lunch break.

Take advantage of rest days and speed up your recovery process

When training for a triathlon, the last thing you probably want to hear is that you need rest days. But rest days are crucial to your recovery. Not resting can actually get in the way of your success. Your body needs time to recover from the workouts and make the necessary repairs. This is even more imperative if your next triathlon is your first half. You’re following your training plan, swimming, cycling, and running. When your regimen calls for a rest day, take it! It will aid in your training and help your body increase its capabilities and stamina. Check out the 4 reasons why you should take advantage of rest days.

  • Give your body a break

If you don’t take rest days during training it can result in stress fractures, sprains, and overall poor performance. Training every day builds stress in your body. Alongside small microscopic tears in muscles that need time to heal, your body also starts to produce excess amounts of the stress hormone cortisol. Over time, this can lead to burn-out, mental fatigue, and physical injuries. Give yourself a break mentally and physically. Pro tip: learn how brick workouts can help you prepare for race day and schedule your off day after them.

  • Speed up your recovery

Yoga on your rest day can aid in your body’s recovery process.

Planned rest days are a core part of your triathlon training, especially as you’re increasing your mileage. If you are constantly training, your body can’t utilize the rest it needs to repair itself. Over time, this will begin to degrade your muscles. By taking rest days when you’re supposed to you can speed up your recovery process. If you feel like you need to do something on these days, try foam rolling or yoga. Both are low-impact options that can keep you busy and aid in your body’s recovery.

  • Catch up on life

Training is a time-consuming process that requires commitment and hard work. But becoming too invested could keep you apart from the other parts of your life that truly matter. Spend your rest day catching up on chores or errands that need to be done. Spend time with friends and family. They’re supporting your training and will be there for you on race day!

Get outside and spend time with your family on your rest day.

You could also catch up on something you enjoy that’s been put to the side during training. All of these provide you with a physical and mental break from training. You’ll thank yourself later.

  • Stay on track

Before selecting a training plan, make sure you know the basics about all triathlon distances. When building your plan, make sure you add rest days to it. Whether you’re training with a coach or just surfed the web to find a plan, everyone advises taking rest days. There are good reasons for this. They are strategically built in to give your body a break, make repairs, and prepare you for the next set of workouts. Stick to your training plan so you can keep progressing as a triathlete. 

Triathletes that incorporate rest days into their training find the best results over the long term. They’re more than just a break from training. Rest days provide your body an opportunity to heal and repair the muscles used. They also provide a mental break so you can holistically recover. As race day approaches, make sure you’re completed prepared by knowing what to expect at your first triathlon.

Execute your plan for a successful first 70.3 distance triathlon

If you love shorter triathlons and are looking for a new challenge, then make your next goal a 70.3 distance triathlon. The 70.3, also known as half, stands for the total number of miles you’ll complete. This includes 1.2 miles swimming, 56 miles cycling, and 13.1 miles running. If all this sounds like a big challenge, don’t worry – successfully finishing a half distance triathlon is a very achievable goal. It’s the same thing you already do at other events. It’ll just take longer! How you approach this new-to-you distance will be different though. And we’re here to help you prepare for your first 70.3 distance triathlon.

  1. Start small and gradually increase

Even if you’re a regular participant when it comes to triathlon, you’ll still need to build up your endurance and stamina. The first step to take for your first 70.3 distance triathlon is to register for the event and commit to your goal. Once that’s set, make smaller goals that’ll lead to your bigger goal. They’ll help keep you on track. Now it’s time to train! 

Build your endurance by gradually increasing your distance.

Intense training is a great way to increase your stamina, but too much training can have an adverse effect on your body. Your body needs time to repair the tiny tears in your muscles that are a natural response to physical training. The right balance between training and rest days is crucial to building up your strength and endurance. For every four days that you work out, include a rest day to give your body the chance to heal. Utilize these tips when you’re ready to increase your running mileage.

  1. Practice open water swimming

Knowing how to swim and be comfortable in open water is crucial to swimming 1.2 miles. Open water swim training can help you prepare for race day. In the right setting, you can also swim longer distances. This helps because you’ll need to increase your distance over time during training. Start slow and increase the time and distance you spend in open water. You can set your goals similar to what runners do, about a 10% increase in distance each week. This gradual increase helps with stamina and increases the chances you avoid physical fatigue on race day. If open water still bugs you out, this advice will help you become more comfortable.

  1. Incorporate brick training

Brick workouts will help prepare you for your first 70.3 distance triathlon.

Brick training involves completing two types of exercises back to back with as little rest as possible in between. For triathletes, this is vital. Brick workouts include swim-to-bike, bike-to-run, or run-to-bike. While you won’t go from running to the bike on race day, this brick will still build endurance and stamina.

Implementing these workouts offer additional benefits. They’ll help you prepare for how transition will feel and what you’ll need. You’ll also get accustomed to how you’ll feel on race day with swim-to-bike and bike-to-run brick workouts. Learn more about brick workouts and check out the different workout examples.

  1. Hydration and nutrition

Your body needs fuel to perform. For a 70.3, the right balance can make or break you during race day. The long-distance and multiple events you’ll have to compete in requires the right mix of nutrition and hydration. Simple sugars and a high-carb diet alone won’t sustain you through your training or during the event. At the same time, foods high in fat slow down digestion. You’ll also need to increase your sodium intake – between 1600-2500 mg depending on how much salt is in your sweat. Aim for a low-fat, low-fiber, and high-carb diet to power through the 70.3 triathlon event during race day. Test different hydrations and nutrition during training to discover what works best for you.

Discover what hydration and nutrition work for you during training.

Aim for at least 100 calories/hour for your race-day caloric intake. At the same time, consistently hydrating yourself is just as important. You need to compensate for the sweat you’ll lose during the event. Remember, just like shorter distances, nothing new on race day! Here’s a deeper breakdown of how to fuel during the race.

In addition to the above, you’ll need dedication, consistency, and hard work. All of these combined will help prepare you for your first 70.3 distance triathlon. Keep in mind, not should change from how you’ve trained for shorter distances. What will change is the amount of time needed to train for and complete the increased distances. Soon enough you’ll cross your first 70.3 distance finish line!

Build your endurance and become a better runner when you increase your run mileage

It’s been said that running is addictive. It’s also the final leg of triathlon, when you’re most exhausted. We want to go fast, push the boundaries, and better our overall time. Running longer distances is one way to learn about mental fortitude and finish your next triathlon strong. With swimming and cycling, your goal to increase your run mileage can be overwhelming when you look at the goal by itself. But we’re here to help every step of the way! Follow our guidelines and the tips below for the best way to increase your run mileage. It’s the best way to grow as a runner, reduce the chance of injury, and work towards your big goal! Pro tip: build this into your overall training plan for optimum results. Pro tip: get a new pair of shoes before you increase your run mileage if your current pair has too many miles.

Do the work – (EVERY DAY)

This is self-explanatory! Whether it’s a rest day or your longest run ever, you have to do the work. You don’t need to set records or PR every time, but you do need to be consistent. That’s how you’ll build your running stamina and teach your body to run further and further. If there’s a day where you just can’t squeeze in a run or workout (because life happens), don’t stress. Don’t try to make it up the next day. Squeeze in a foam roll or stretch session if you can and keep moving forward with your plan! Pro tip: check out these 6 motivational tips if you need a boost.

REST – (1-2 times per week)

If your training plan calls for a rest day, TAKE THE REST DAY. This allows your body the chance to recover from the previous swim, bike, or run. If you get the itch to do something, make it active recovery. Foam roll throughout the day. Set aside time for deep stretching. Take an online yoga class. Those three options will speed up the recovery process and get you ready for the next day.

Build your running stamina – (2-3 times per week)

As you increase your run mileage, you learn to get comfortable with being uncomfortable. Every new long run represents a new PR for your longest run. As you hit new distances, it’s important to remain focused on form and technique. Don’t get sloppy! Remain as efficient as possible at the end of your run. Focusing on your form will allow you to generate power efficiently. This will also help with your body’s ability to consume oxygen. Brick workouts are another great way to build your stamina. Running after cycling or swimming will introduce your body to running when you’re tired. Brick workouts will prepare you for race day.

Increase body strength – (2-3 times per week)

You’ll need to prepare your body for running longer and longer distances. Break up running workouts with weight workouts. You don’t need heavy weights. Focus on lighter weights with higher repetitions. You want to push the body, burn fat, and build lean muscle. Working muscles differently than when you’re running is critical. It helps prevent the overuse of the same muscles. No weights? No problem. Focus on body resistance exercises like push-ups, sit-ups, squats, and lunges.

Set smaller goals – (1 time a week)

On a weekend morning, when it’s coolest, push yourself to run further than you did last weekend. Do this alone if needed, but running with a friend has tremendous benefits. When preparing to increase your mileage, setting that small goal of going longer than before teaches your mind and body it’s capable of completing longer distances.  You’ll eventually see that last week’s distance that was difficult is now easier. Over time, what was once thought impossible will become your warm-up. Slowly but surely increasing your mileage will put you in a prime position to run further and further. Pro tip: one speed workout a week will help you on your long runs.

There are many other factors that can impact how you increase your run mileage: diet, hydration, nutrition, cross-training, injuries, etc. Those items can be built-in and managed as you progress. Just remember, you don’t just wake up and run longer distances. Persistence and consistency are needed. Do you listen to music when you run? Add these 5 songs to your next playlist!

Learn why every training plan should include brick workouts

Triathlon is an extensive physical competition that tests versatility in swimming, biking and running. Making brick workouts a part of your training can help you significantly improve your performance. A brick workout involves consecutive sessions of two triathlon activities, usually biking and running, in any order. This workout helps you develop the ability to complete one physical activity after another. It is an integral part of training for all training distances. Brick workouts help you prepare for swim-to-bike and bike-to-run transitions. Pro tip: test your nutrition and hydration plans during brick workouts and discover what works best for you.

Swim-to-bike

This is usually the first transition you make in a triathlon. When you pedal the bike after a period of swimming, the labor shifts from your arms to your legs, causing some discomfort. This discomfort is down to abruptly switching from a horizontal position while swimming to an upright position for cycling. So, for reducing the transition impact during the event, it is reasonable to do this brick.

If you are preparing for a Sprint or Super Sprint event, you can try a 200-300 m swim followed by cycling for 10- to 25-minutes. For Olympic distance, a swim session between 300 and 600 m with a 20-40 minute cycling period is ideal. Those prepping for Half Distance (70.3 mi) should aim to swim between 1000 m and 1500 m, along with 60 to 80 minutes of cycling. A brick session including 2000-2500 m of swimming and 145-210 minutes on the bike is suitable for Full Distance (140.6 mi) training. Make sure you have swim goggles that are just right for you.

Bike-to-run

It is probably the most common brick workout. It is also arguably the toughest because, after a period of biking, your legs feel heavy and are difficult to move. However, after getting a few brick sessions under your belt, your leg muscles shall start recovering well from the wear and tear of biking, letting you run easier.

For short distances like Super Sprint and Sprint, a 30- to 20-minute cycling session, followed by a 15-minute run is a good place to start. For Half and Full Distance triathlons, you can either cycle 60-80 mile & run for 20-30 minutes or cycle 30-60 mile & run for 45-90 minutes.

Run-to-bike

Although you are not likely to face a run-to-bike transition in a triathlon, this brick certainly helps you build endurance and stamina. This is especially useful for duathlons which include a run-to-bike transition followed by a final run.

A 10- to 20-minute run, in build-up to a 30- to 120-minute cycling session, is preferable for Olympic distance and less. In case you are training for anything beyond Olympic distance, a 20-minute run followed by cycling for 75 to 120 minutes is fairly competitive. Learn how you can refuel at gas stations for your longer bike rides.

Wetsuits Care Instructions

Wetsuits are as big of an investment as they are helpful in the water. That is why proper care is important. Share on X

By following these simple wetsuit care steps you will extend the life of your investment.

  1. Wetsuits can be used in all open water conditions. You should not use your wetsuit in a chlorinated swimming pool. Over time the chlorine will damage the seams and degrade the fabric of the suit. No matter the water, you should always rinse your suit in clean cool water after each use.
  2. To preserve the life of the wetsuit always store your wetsuit lying flat or hanging in a dry place on a thick plastic hanger. Wetsuits can be heavy so make sure the hanger is sturdy, you don’t want to find your wetsuit crumpled up at the bottom of a closet.
  3. Make sure your wetsuit is completely dry before you put it away or it will mildew and STINK! You can turn your wetsuit inside out to help it dry faster. Never leave your wetsuit out in the sun to dry.
  4. Periodically wash your wetsuit with wetsuit shampoo. This will keep the integrity of the fabric as well as keep it from becoming mildewy and stinky.
  5. Only use approved lubricates when putting on your wetsuit. Like chlorine, unapproved lubricants can degrade the fabric and will have your wetsuit falling apart at the seams. Petroleum jelly (Vasaline) or any other petroleum-based product will literally eat holes in your suit lining.
  6. If you have to travel with your wetsuit, fold as stated below. Having fold seams and a crumpled suit will lead to more likely tearing when you are putting the suit on. :Fold up legs half way up.
    1. Fold arms over in an X
    2. Fold the remaining legs over the arms and torso.
    3. Unfold when you get where you are traveling.