Tag Archive for: bikes

Look your best in your Kerrville Tri race day photos with these great tips

Lights, camera, action! 📸 In the thrilling world of triathlons, every heartbeat, every pedal stroke, every determined stride is a moment worth capturing. Whether it’s your first race at the Kerrville Triathlon Festival or you’re a seasoned pro, nailing that perfect race photo becomes part of the victory. But how do you freeze those split seconds of glory into a frame? You’ve trained hard for the race; now it’s time to make sure the camera catches you at your best! Dive into our insider tips and tricks, and let’s make those race photos as epic as your performance. 🏊‍♂️🚴‍♀️🏃‍♂️

Swim

1. Think about your form

Looking good, heading into transition at Kerrville Tri

We have professional photographers out along the racecourse to capture your best moments throughout the triathlon. Since you know photographs are being taken, attempt to tighten up your form during the swim. You’ll be pleasantly surprised at how awesome a mid-swim photo of yourself can be!

2. Be ready to Smile

As you are making your way out of the water into T1, you can count on one of our amazing photographers to be there to capture the moment. Pro tip: smile BIG! We love seeing our participants having a great time moving on to the next portion of the tri, and these are often some of the coolest photos we get from Kerrville Tri!

Bike

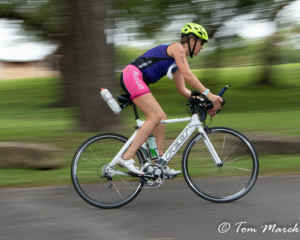
1. Check your positioning

Giving the camera a thumbs up and a smile on the bike

Flash a quick thumbs up to the camera when you see it along the bike portion!

Bike photos are an awesome chance to get a great close-up race picture. However, no photo is worth losing control of your bike. We know everyone has their favorite riding position to be in when in the saddle. Rather than changing the position you’re comfortable with, simply give the photographer a smile or a thumbs up when you cruise past them! You’ll be very impressed at how they turn out. Keep your eyes on the road and flash the photographer a smile when you pass them by!

Run

1. Position your bib in T2

To make sure your personalized bib can be seen in your race photos, place it in the front-center of your race tri suit or shirt.  This is also important for the automated photosystems to use this to tag your photos. This way you don’t have to sift through thousands of photos to try and find yourself, FinisherPix will do it for you!

2. Stand Tall

After the swim and bike portion, we know you’ll feel tired throughout the run course. This is when we tend to let our shoulders fall forward. But, when you see the photographers up ahead, stand up a little taller! No matter how you feel on the inside, this is a sure way to make you look effortless during the run portion.

3. Lengthen your stride

Running through the Kerrville Tri run course

Look at that stride!

Elongate the appearance of your legs by lengthening your stride for a couple of steps when you see a camera! You don’t want to do this for the entire run portion of Smokin’ Good Tri, but it won’t hurt for a couple of photos when you catch a glimpse of the camera (not to mention, you’ll love how long your legs will look in these photos)

4. Relax your face and think positive

We know, easier said than done, but start practicing now when you go out for your training runs. Make your cheeks soft and say the word “Money.” Give it a try in the mirror and see for yourself. Hopefully, you’ll already be smiling from all the fun you’re having during the triathlon, but when you see a photographer ahead of you relax your face and enjoy yourself! We can assure you, the pictures are bound to turn out fantastic! Giving the photographer a thumbs up, about to cross the finish line!

5. Have fun!

This is by far the most important thing to remember if you want some incredible race photos. If you’re having a good time, it’ll show in the pictures. The photographers are there to capture your accomplishments, so the most important thing to remember is to have fun! You’ll be able to look back at these photos forever, so it’s important to make the most out of your experience.

And there you have it! Your comprehensive guide to looking your best in every snap from start to finish at the Kerrville Triathlon Festival. 📸 Whether it’s a poised swim shot, a dynamic bike capture, or a triumphant run moment, these tips are your secret sauce to memorable race photos. Don’t forget, your biggest asset is the joy of the race itself – let it shine through, and the camera will do the rest. Ready to immortalize your incredible achievement? Pre-order your photos now with FinisherPix and lock in that great discounted price. See you at the finish line, smiling and ready for your close-up! 🏁 🎉

Follow these steps, and get ready to look your best in all your Kerrville Tri race day photos! Pre-order your photos now with FinisherPix to get a great discounted price!

Adjusting your bike to the perfect saddle height is crucial in order to maximize comfort and payoff during your training rides for Kerrville Tri. Incorrect height leads to pain and discomfort during and after your ride. It can also prevent you from improving your performance on the bike. Learn the importance of correct saddle height, and how to adjust your bike to the perfect fit with these easy steps.

What is Saddle Height?

Saddle height is measured by the distance between the center of the pedal axle and the top of the saddle, or your bike seat. This is set by adjusting the seat post to your ideal height to balance your comfort and power on the bike. This height is arguably the single most important adjustment on your bicycle. Incorrect height can contribute to discomfort in the saddle, anterior and posterior knee pains, and ultimately limit how much power you produce.

How To Adjust Your Saddle Height

There are many ways you can approach finding your perfect saddle height. One of the best approaches is to establish it based on the rider’s individual ride characteristics and flexibility. You can follow the “heel to pedal method” before your next ride. This will get you in the ballpark.

  1. Stand next to your bike and raise the saddle to your hip to get an idea of where to start.
  2. Get on your bike, and place your heel on the pedal to determine if you will raise or lower your saddle.
    • If you are having trouble making contact with your heel to your pedal – the seat is too high.
    • If your knee is bent – it is too low.
  3. Put your bike on the trainer and adjust accordingly.
  4. Get back on your bike with your heel on the pedal and pedal backward to reach the six o’clock position.
  5. Your leg should be completely straight, without being overextended to achieve the correct saddle height.

Pro tip: Make very small adjustments during this process, then repeat until you have found the perfect height.

Ready to Ride

Once you find the proper height, use a piece of electrical tape around at the base of the post where it meets the seat clamp as a marker. Take a tape measure and record the measurements, in case you need to make very slight adjustments in the future.

Have a professional look at your bike every few years to achieve maximum comfort. After adjusting your bike to the perfect saddle height, make the first few rides short. Give it time!  Your body may need a few sessions to adapt to your new height before you feel yourself improving on your cycling journey. How often do you check your saddle height? Let us know on Facebook and Twitter.

When it comes to choosing bike pedals, you need to consider the best option to meet your needs depending on the kind of riding you’ll be doing. It’s all about personal preference and what you feel most comfortable with. If you’re in the market for some new pedals, keep reading to understand the different types of bike pedals to figure out which ones are right for you.

Types of Pedals:

There are two basic types of bike pedals: Flat and Clipless. Flat pedals are the more common of the two when it comes to triathlon because you wear regular running shoes with this type of pedal. Which is great and convenient for the bike to run transition. Clipless pedals are great for athletes who want to feel more at one with the bike. With these pedals, you’ll need to wear special cleats that clip into the specific type of pedal system that’s compatible with your cleats.

Different Benefits:

Flat Pedals

There are many benefits of flat or platform pedals. Any type of shoe you decide on will work with this type of pedal. They’re great for a quicker bike-to-run transition because, without changing shoes, you eliminate the need to spend any more time in transition.

Flat pedals also reduce any anxiety you may have about falling over during the bike leg. You can put your feet down to catch yourself, as opposed to if you were clipped into the pedals. Lastly, this is the more common and affordable option of the two kinds of pedals. Flat pedals can be found for $10 – $40.


Clipless Pedals

There are also many benefits of a Clipless Pedal (clipless means clipped in). Increase your speed during the bike portion by being clipped into your bike pedals. This allows you to take full advantage of your pedal stroke, which in turn allows you to ride faster once you have mastered the push and pull of it.

A smoother more efficient pedal stroke will lead to better average power output. Being clipped in can actually keep you a little safer while riding because it reduces the chance of your foot slipping off the pedal while climbing, descending, or fatigued. There are endless options when it comes to choosing clipless pedals if that is the

You can go clipless right from the start or use flat pedals until you are more comfortable in the saddle. There are benefits to each type of pedal, but the important thing is to choose what is more comfortable for you. Whatever you choose, spend time becoming familiar with your bike pedals to maximize your efficiency on race morning of Kerrvile Tri!

Learn what causes skipping chains and what you can do about it

There are two main causes for skipping chains. The most common cause is the misalignment of the rear cogs and the chain itself. The second most common cause of skipping chains is wearing on the chain, cassette, and/or the chainrings. Read below to see what causes each and how you can prevent chain skipping and extend the life of your bike.


There are several things that can cause the misalignment of the rear cogs and the chain.

  • Improper cable tension. When the tension is incorrect the chain does not sit in line with the corresponding cassette cog and is trying to jump to the next cog. 
  • Dirty cable. The dirt prevents the cable from moving like it needs to. 
  • Slightly bent hanger for the rear derailleur. Can affect the alignment.


Skipping chains will wear on the chain, cassette, and/or the chainrings. The chain is the most likely to wear out first since it is made entirely of small, moving parts. Those parts tend to wear out faster when they are dirty or ridden dry. Chains on most modern drivetrains usually last anywhere from 1500 to 2000 miles. This can change depending on your riding style and how well you maintain your bike. If you keep your drivetrain clean and you tend to spin at a slightly higher cadence then you will get more mileage out of your chain. Follow these six steps to clean your drivetrain.


When the chain wears, it no longer sits evenly on the cassette cogs and chainrings. As this goes on the chain will eventually start to jump since the chain wears much faster than the cassette and chainrings. If you let your chain go too long it will start to wear down the teeth of the cassette first and then the chainrings. If the chain is replaced before it is too worn the cassette and chainrings will outlast the chain many times over. You’d much rather want to replace your chain than the cassette and chainrings.


Pro tip: Use this bike tool to measure chain wear at home. 


Learn what a bento box is and how you’ll enjoy longer bike rides with it

Cyclists need proper nutrition, especially on longer rides. A bento box is a lightweight and effective way to carry more nutrition for your long bike rides. Carrying a gel or a waffle in a jersey pocket is a good option for short to medium distances. But when you’re increasing your mileage, lack of nutrition can lead to fatigue. During longer training rides you want to carry enough fuel with you without affecting your balance. Before you begin any long rides, make sure your bike has had a proper tune-up.

Bento boxes have a minimalist design, won’t flap around in the wind, and aren’t too clunky. They’re also available in a variety of sizes. Some bikes have fittings designed to install bento boxes. However, most of them are affixed with Velcro straps to your bike frame. The ideal bento box should be small enough to not slow you down or impact your form. But you also want them to be large enough to carry everything you need. Are you ready to add a bento box to your bike? Check out three of our favorites below.

Zone3 Aero Top Tube

The shape of this Zone3 Top Tube allows you to carry what you need without overloading your bike. This bento box can be fitted to the top tube of your bike around the stem. It has loop straps and four hooks. It neatly fits the frame of your bike. You’ll have easy access to everything you need during your ride. This box can also store your phone, keys, or credit card. It’s manufactured from a waterproof material with a large waterproof zipper.

Apidura Top Tube Pack

Apidura is known for its ultralight equipment, like its Top Tube Pack. This box is made from tear-resistant, lightweight, and waterproof Hexalon material. This tough, durable pack is lightweight, weighing only 107 grams. It has dual mounting positions to suit different bikes. The flip-top lid has a magnetic closure making opening and closing very easy. In case your bike does not have top tube mounting points, Apidura provides Velcro straps to strap the pack to the top tube.

Oveja Negra Snack Pack XL

This bento box comes in lots of designs and colors. The Snack Pack remains stable in any road condition due to its wide Velcro top-tube strap. This bag has a large interior and a zipper which can be easily grasped even with gloved hands. The Bolt-On Snack Pack is available in different sizes and bolt-on styles. It weighs 3.6 ounces and is made in the USA.

“Comfort zones: If you live in one too long, that becomes your norm. Get comfortable being uncomfortable.” — David Goggins

If you’ve ever completed a triathlon, you already know what it means to break through your comfort zone. Not everyone can, or will accomplish that in their lifetimes. But when it comes to the off-season, it’s easy to fall into your couch and let the weeks fly by. This article will show you how making new goals during winter training can actually transform you.


Where Are You Headed?

So you’ve done a triathlon or more. You’re no stranger to discipline. You know what it means to endure long hours of training just to arrive at that final cathartic moment when you blaze past the finish line.

And now it’s off-season. Winter’s here. You can feel it in your bones. Your calendar’s filled with parties and other fun activities instead of training.

This is when the days grow shorter, and the ground becomes colder. None of these are ideal circumstances for training outdoors. So why not relax and let loose?

Here’s the thing.

You don’t suddenly transform into who you’re supposed to be on race day. You get there — slowly — by sculpting your body day-after-day, inch-by-inch. 

Everything you do before race day is what makes you who you are. In this sense, it’s arguably more important that you participate in winter training than at any other time. 

All else remaining equal, the athlete who doesn’t let themselves go during the off-season has a competitive edge over everyone else who does. 

And just because it’s winter doesn’t mean you can’t train. While it’s not the most ideal time for breaking your past records, it is the best time to focus on maintenance, covering up weaknesses, and becoming injury-proof.


Enter The Half Marathon

Whatever goals you might have for the future, it’s a good idea to do half the distance of next season’s race in preparation. You don’t need to exceed a half-marathon.

Stay active, but reduce the length of all your training sessions. This is because you want to focus on recovery, overcoming injuries, and keeping your mind sharp. 

As long as you stick with a consistent regimen, you can always add or subtract volume later. But if you completely ignore winter training then it’ll take a long time for your body to return to its peak condition. You need to keep the engine running so you can jump into action whenever you need to.

Even if you can’t go outside, you can swim, bike, and run on a treadmill indoors. You can fix up imbalances, weaknesses, or take up yoga and strength training to explore new ground.

One of the best ways to experience a half-marathon is through the 3M Half marathon that’s held in Austin, Texas on January 23, 2022. This event features a course that’s 13.1 miles (21.08 km) long. It ends with a post-race party that’s filled with plenty of food trucks serving some of the best tacos and BBQ you’ll ever have. Make sure to sign up before race day to remain eligible.

Or, if you wait a little longer, you can enter the Ascension Seton Austin Marathon, Half Marathon and 5K on February 20th. This course passes through some of the most iconic landmarks in Austin, and is close to some amazing hotels, restaurants, and shops that you can enjoy with your whole family.

Don’t think. Sign up now. Imagine crossing the finish line to a roaring crowd all over again. You’ll only ever regret the things you don’t do and never the things you’ve done.


Follow our advice to get better at hydrating while cycling

If you’re new to cycling, one of the challenges to get accustomed to is knowing how to drink water while peddling. Just as there is skill needed to balance, ride curves, and pump uphills, technique is needed to hydrate without losing your balance and falling off your bike. Here are some tips for hydrating while cycling.

Use a squirt-top bottle instead of a cap bottle

A water bottle with a cap requires you to twist it open, which is cumbersome to do with one hand on a bike. When it comes to squirt-top bottles, you can simply use your teeth to open the valve and start drinking with one hand as you control your bike with the other. The convenience a squirt-top bottle offers during cycling allows you to focus on the course more and avoid any accident.

Make use of the bottle cage on your bike

To carry water on the road, you can use a bottle cage on your bike. The bottle cage can be installed between the bars, on the frame, or near the saddle to help you reach your drink with zero fuss. Here are the pros and cons of each bottle cage.

Aero Bottle Cage

This type of cage is designed so that it can be attached to multiple parts of the bike frame. Most other cages can only be mounted to the frame.

Pros
– easiest to access
– option to install it either vertical or horizontal
– using horizontal bottles at the front can decrease aerodynamic drag

Cons
– poor aerodynamics compared to other cages
– using vertical bottles can cause even higher aerodynamic drag.

Bike Frame Cage

These are very common bottle holders that can be placed on the frame, seat post, or handlebars.

Pros
– slim aero bottles on the down tube are less affected by drag and side wind.

Cons
– intermediate aerodynamic drag
– large frame-mounted bottles are expensive and difficult to clean.

Rear Hydration System

This is an aerodynamic bottle that is mounted behind the seat post. These are more so used by competitive triathletes partaking in very long distances.

Pros
– best choice in terms of aerodynamics
– least affected by side wind

Cons
– requires a cage with a strong grip to prevent bottle-launching
– must be made of a favorable material to oppose side sway

Take advantage of the straight-aways

Think about when the ideal time to take a sip is and be ready to do so. Trying to pull the water bottle out on curves is much more challenging, so wait until the trail is flat and straight to get your drink.

Practice, Practice, Practice

Ride up and down your street over and over and practice. Pull your water bottle out of the cage, take a sip, then put it back while moving forward. Start off slow and pick up speed as you get more comfortable.

Pro Tip: Avoid quenching your thirst in one go

Kerrville TriathlonExerting your body through exercise causes dehydration which makes you thirsty. Despite your desire to rapidly quench your thirst it’s important to not drink too much. It can be counterproductive and negatively affect your performance. It is best to avoid drinking mouthfuls and only take a few sips occasionally. You can hydrate yourself effectively without running the risk of drinking too much.

To make sure you do not run yourself dry, you should consume around 600-900 ml of water, per hour, during a triathlon, in addition to other nutritional needs. Although triathlons will have water available in transition and on the run course, not all triathlons provide an aid station on the bike course. Make sure the water bottle(s) on your bike are full so you don’t run out of water.

Hydrating while cycling can be tricky if you’re not used to it. With a secure bottle cage and lots of practice, you’ll be able to master this skill in no time.

Implement these group riding guidelines on your next ride

Group riding provides cyclists with enjoyment, exercise, training, support from other cyclists, and safety. Whether you’re riding to lunch with co-workers or completing a 50-mile Kerrville Triathlon Festival training ride with your crew, the following group riding guidelines will come in handy. Knowing these basic group riding guidelines will also make the ride more enjoyable and safer for everyone involved.

* Complete a quick, pre-ride safety check.

* Obey all traffic laws.

* Operate bike in such a manner as to not offend or endanger motorists, pedestrians, etc.

* Wear a helmet for safety (and be a good model for children).

* Activate all lights on bikes.

* Wear reflective gear that makes the group more visible, even in the daytime.

* Ride single file except in areas where it is safe to ride side-by-side.

* When riding in a pack, look at “shoulder level” of cyclists in front of you. This allows you to see what is happening further up the road and not focus on the cyclists in front of you. Fixing your gaze on the back tire of the person in front of you doesn’t give you enough time to react should the entire group slow down.

* It is the responsibility of the lead rider to notify the cyclist behind them of approaching issues by saying, “jogger up, cyclist up.” This includes any potential danger that may lie ahead. It is the responsibility of each cyclist to pass the caution back to the person behind them.

Important hand signals

* Hand signals, instead of words, are used to warn riders of potential danger on the roadway. In a pack, oftentimes, the only cyclist who has enough visual warning is the front cyclist. Therefore, it is the responsibility of the lead rider to warn the cyclists behind them. If the lead cyclist (or the cyclist in front of you):

  • shakes their hand to the right = there’s a pothole, branch, or some obstacle to the right
  • shakes their hand to the left = there’s an obstacle to the left
  • puts hand behind their posterior = follow right behind them as there might be obstacles on both sides
  • puts right hand down with the flat of the hand facing you = lead cyclist is slowing down or coming to a stop

* Avoid slowing down abruptly or making any other sudden moves.

* Ask experienced riders questions when you’re not sure what is occurring.

Introducing the Official Bike Mechanic for Kerrville Tri – James Balentine, owner of City Limit Cycles

Tune-up your bike and know how to change your own flat tire before race day. If you arrive in Kerrville and something occurred to your bike during transit, James and his City Limit Cycles van will be at your service during bike check-in on Friday and Saturday. James is also turning wrenches race morning (both days) should last-minute issues arise. He’ll set up shop at the southeast corner of T1 (off Guadalupe St.) Saturday and Sunday morning.

For more than two decades, James worked as a bike mechanic at bike shops, including a decade as Head Mechanic for Jack & Adam’s Bicycles in Austin. For the past 14 years, James has traveled the world volunteering as the mechanic at Triathlon World Championships for Team USA. He has also helped Olympians for Team USA Paratriathlon in Brazil and continues to volunteer for Team USA Paratriathletes.

James likes bikes. He likes to see and hear them running perfectly because he likes to see you riding them with a smile. His service experience is built around a lifetime passion for all things cycling. He’s been a pro racer, a pro mechanic, and pro-level bike geek.

Through it all, James brings a high level of professionalism and attention to detail. He has cared for all kinds of riders from recreational to pro and literally every kind of bike on the planet! Click To Tweet
City Limit Cycles is James’ mobile bicycle repair company. Now a world-class bike mechanic comes to your door so you can focus on what you love most – more saddle time. We’re lucky to have someone of his caliber at Kerrville Tri for the entire weekend. Follow City Limit Cycles on Facebook. and follow his bike cleaning advice!

You should strive for a clean drivetrain

While you’re hanging around this summer, why not try your hand at making sure you have a clean drivetrain? With these simple steps, you’ll be the grease monkey you always dreamed of being! Not only that, but keeping your drivetrain clean and lubed extends the life of your bicycle and helps maintain proper shifting performance and pedaling efficiency.

Steps:

1. When riding primarily on roads, you should clean and re-lube your chain at least once every three or four rides, depending on the conditions (rain, excessive road grit, etc.).

2. Run the chain backward through a clean cotton rag until the chain is fairly clean and dry. Lube the chain with your favorite lube, making sure that some lube gets on each link. Run chain back through the rag once more to remove excess lube. Don’t have a favorite chain lube? Check out 2 of our favorites White Lightning Clean Ride or Bike Medicine Purple Extreme.

3. Clean the cassette or freewheel. You can “floss” the cassette or freewheel with a clean rag to remove built-up gunk. If it is really dirty, you may want to scrub the cassette or freewheel cogs with an old toothbrush and some de-greaser.

4.  Wipe off your front and rear derailleur. Afterward, spray the derailleur pivots with a light, penetrating lube.

5. Wipe off your chainrings from time to time with a clean rag. If they are really dirty, you may want to scrub them with an old toothbrush and some de-greaser.

6. Clean the rear derailleur jockey wheels from time to time with a clean rag to prevent the build-up of gunk.

Tips:

If your chain is really dirty, you may need to remove it to clean it properly. However, if you regularly follow the steps above, you will not need to do this. You can buy chain cleaning kits which run the chain through a solvent bath. You can also use a wide mouth soda bottle, Gatorade bottle, or old water bottle as a chain bath. Again, following the recommendations above should keep your drivetrain clean.

You should generally replace your chain every 2000 miles. If you wait longer than that, your old chain may begin to put undue wear on your cassette or freewheel. Don’t forget to wash your bike!

Happy cleaning!

James Balentine, owner of City Limit Cycles